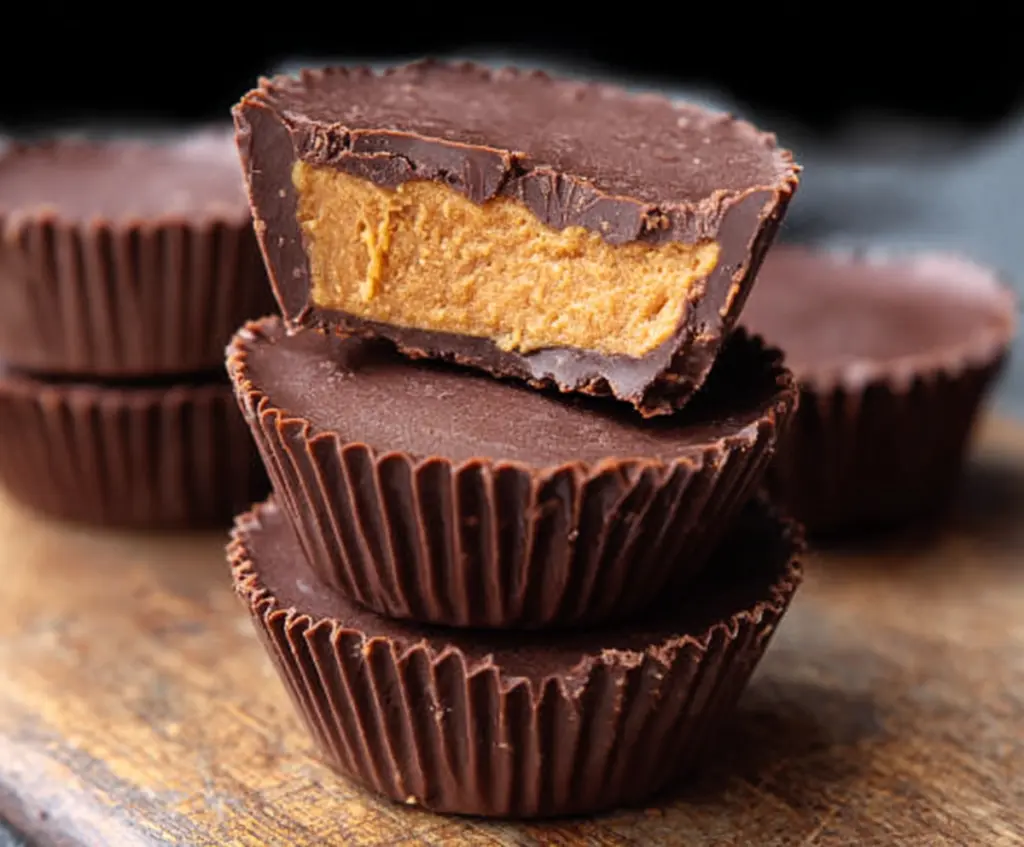
Classic Homemade Reese’s Peanut Butter Cups bring together two of the best things—smooth chocolate and creamy peanut butter—in a sweet, chewy bite. These treats have a perfect balance of rich chocolate and salty peanut butter that makes them so hard to stop eating. They’re just like the candy you love, but homemade with that extra special touch.
I love making these at home because I can control how much peanut butter goes inside and choose my favorite type of chocolate. Plus, it’s fun to see the layers come together and enjoy that satisfying snap when you bite into them. Making them yourself also means no preservatives or strange ingredients—just simple, tasty goodness.
One of my favorite ways to enjoy these is straight from the fridge after they’ve set, so the chocolate is firm but the peanut butter is still soft and creamy. They also make a fantastic gift or a sweet surprise for friends and family. I always feel a little proud handing out homemade peanut butter cups, knowing they’re made with love and care.
Key Ingredients & Substitutions
Peanut Butter: Creamy peanut butter works best for a smooth, spreadable filling. If you prefer crunchy, you can try that too, but it changes the texture. For allergies or dietary needs, almond or sunflower butter are good alternatives.
Butter & Powdered Sugar: Butter adds richness and helps the filling set nicely. Powdered sugar sweetens and thickens the peanut butter mixture. You can use powdered erythritol for a lower sugar version.
Chocolate: Semi-sweet chocolate chips melt well, providing a rich coating. You can switch to milk chocolate for a sweeter taste or dark chocolate if you like it less sweet. Adding a bit of coconut oil helps smooth out the melted chocolate.
How Do You Get the Perfect Chocolate Shell Without Cracking?
Making the chocolate shell smooth and firm is key. Here’s how I do it:
- Use good quality chocolate and melt it gently in short bursts, stirring well to avoid burning.
- Pour some melted chocolate into the liners first and chill until set—this forms a solid bottom layer.
- After adding the peanut butter filling, cover it fully with chocolate, so the filling won’t peek through.
- Chill the cups thoroughly to help the chocolate harden evenly.
- Before removing from the fridge, let them sit briefly at room temperature to prevent cracking when unwrapped.
Equipment You’ll Need
- Mini muffin tin or cupcake pan – I prefer this because it shapes the cups perfectly and is easy to work with.
- Paper cupcake liners – these make cleanup simple and give a neat, professional look.
- Microwave-safe bowls – perfect for melting chocolate and mixing ingredients safely.
- Spoon or small spatula – helps spread the melted chocolate evenly in the liners.
- Refrigerator – to chill and set the chocolate and peanut butter layers thoroughly.
Flavor Variations & Add-Ins
- Use dark or white chocolate instead of semi-sweet for different flavor profiles.
- Mix in crushed pretzels, cookies, or chopped nuts for added crunch.
- Stir a pinch of cinnamon or a splash of bourbon into the peanut butter for extra flavor.
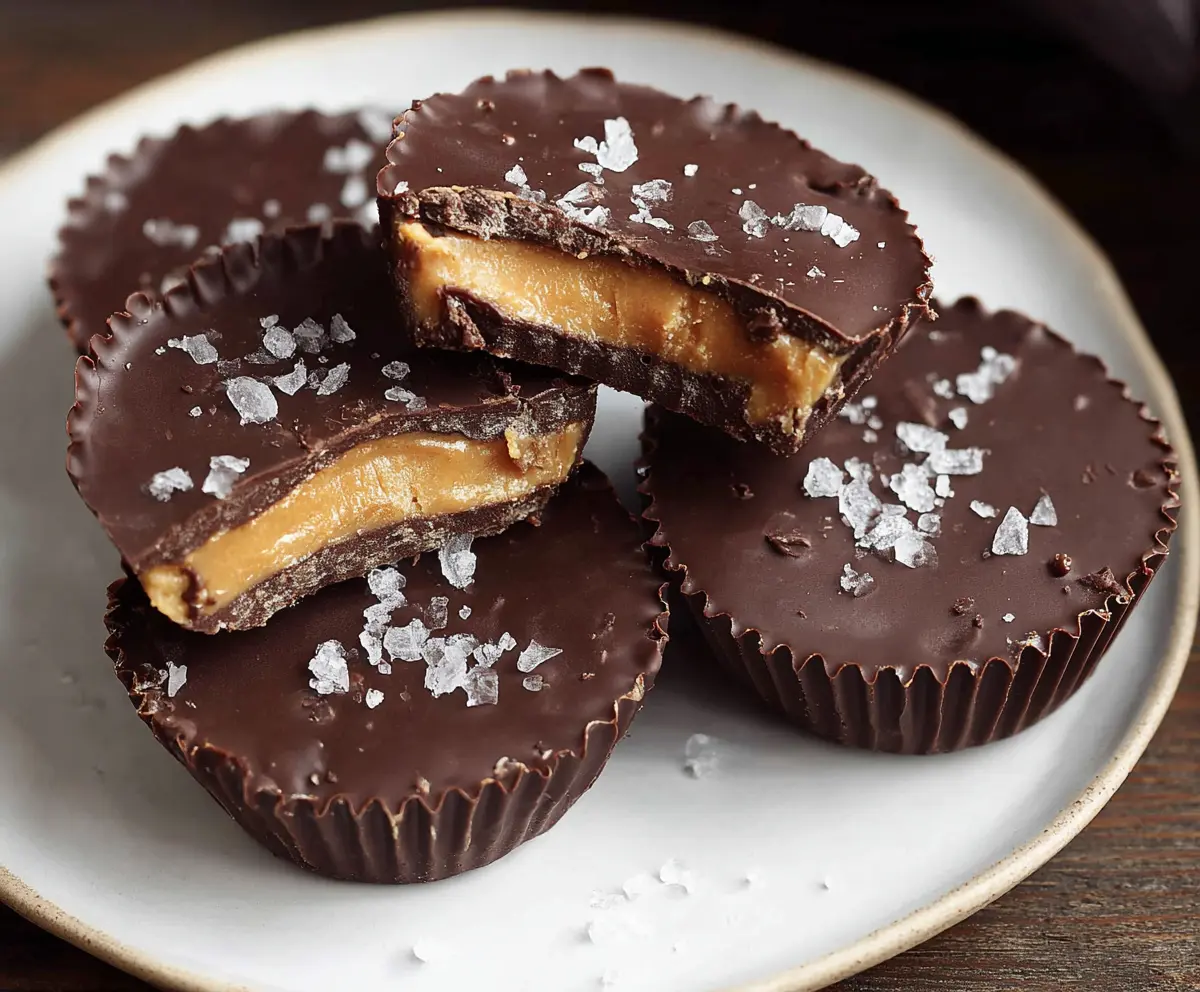
- Add a layer of jelly or caramel on top of the peanut butter before sealing with chocolate for a fun twist.
Classic Homemade Reese’s Peanut Butter Cups
Ingredients You’ll Need:
- 1 cup creamy peanut butter (preferably unsweetened or lightly salted)
- 1/4 cup unsalted butter, softened
- 1/4 cup powdered sugar, sifted
- 1/2 teaspoon vanilla extract
- 2 cups semi-sweet chocolate chips or chocolate melting wafers
- 1 tablespoon coconut oil (optional, for smoother chocolate)
How Much Time Will You Need?
This recipe takes about 20 minutes to prepare, plus at least 1 hour and 10 minutes for chilling and setting. You’ll spend a few minutes mixing the peanut butter filling, melting and layering the chocolate, then let the cups firm up in the fridge. Perfect for a sweet treat with minimal fuss!
Step-by-Step Instructions:
1. Prep Your Pan:
Line a muffin tin or cupcake pan with paper liners to make your peanut butter cups easy to remove and enjoy. Set the pan aside while you prepare the filling.
2. Make the Peanut Butter Filling:
In a medium bowl, mix together the creamy peanut butter, softened butter, powdered sugar, and vanilla extract. Stir until smooth and fully combined. This tasty filling is the heart of your peanut butter cups!
3. Melt the Chocolate:
Place the chocolate chips and coconut oil (if using) in a microwave-safe bowl. Microwave in 30-second bursts, stirring well after each, until the chocolate is completely melted and silky smooth.
4. Form the Chocolate Base:
Drop 1 to 2 teaspoons of melted chocolate into the bottom of each paper liner. Use the back of a spoon or a small spatula to spread it evenly, covering the base. Pop the pan into the fridge for about 10 minutes so the chocolate can harden.
5. Add the Peanut Butter Layer:
Take the pan out of the fridge and spoon roughly 1 tablespoon of the peanut butter mixture onto each chocolate base. Gently press it down to spread into an even layer, but keep some thickness for that lovely peanut butter bite.
6. Cover with More Chocolate:
Pour and spread more of the melted chocolate over the peanut butter, making sure it’s completely sealed. This keeps the creamy filling enclosed in a perfect chocolate coat.
7. Chill Until Set:
Place the peanut butter cups back into the fridge for at least 1 hour. This helps the chocolate firm up and the cups hold their shape.
8. Serve and Store:
Once the cups are set, let them rest at room temperature for a few minutes so the chocolate isn’t too hard to bite. Store any leftovers in an airtight container in the refrigerator for up to two weeks. Enjoy your homemade classic treat!
Can I Use Natural Peanut Butter Instead of Creamy?
Yes, you can use natural peanut butter, but it may be a bit runnier and softer, which can make the filling less firm. To help it set, you might want to add a little extra powdered sugar or chill the filling before assembling.
What’s the Best Way to Melt Chocolate Without Burning It?
Microwaving in 30-second intervals and stirring after each session is key to prevent burning. You can also melt the chocolate gently using a double boiler on the stove, stirring constantly until smooth.
Can I Make These Peanut Butter Cups Ahead of Time?
Absolutely! These keep well in the fridge for up to two weeks. Just store them in an airtight container to maintain freshness and shape, and bring to room temperature before serving if you prefer a softer bite.
Is There a Way to Make These Peanut Butter Cups Dairy-Free?
Yes! Use dairy-free butter substitutes and opt for dairy-free chocolate chips. Many brands offer vegan or dairy-free chocolate that works perfectly for this recipe.